
Overview
Program Steps are a simple way to guide your participants through their mentoring journey, one action at a time. You can share a step right away (Instant), on a date you pick (Scheduled), or automatically when a participant does something, like getting their first match (Trigger).
In this article, you’ll learn how to create a step, what each setting means, and how to edit or delete steps later.
Creating a Program Step
- Log in to the Qooper Admin Dashboard.
- Click Steps in the left sidebar menu.
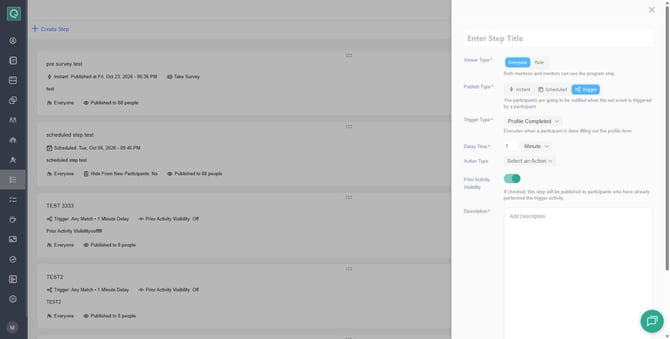
- Click + Create Step at the top left of the page. A panel opens on the right.
- Enter Step Title: Give your step a short, clear name (for example, “Schedule your first meeting”).
- Viewer Type: Choose who can see the step: Everyone, Role, or Match Status. (More on this below.)
- Publish Type: Choose when the step goes live: Instant, Scheduled, or Trigger. Extra settings will appear depending on your choice. (More on this below.)
- Action Type (optional): Add a button that takes participants straight to the right place, like Go to Learning or Schedule Meeting.
- Description: Tell participants what to do and why it matters. You can use bold, lists, links, and colors.
- Click Create at the bottom of the panel. That’s it! ✅
💡 Tip: Fields marked with a red asterisk (*) are required. Changed your mind? Click Cancel and nothing will be saved.

Once a step is published, participants get a push notification on the mobile app or website letting them know a new step is ready. 🎉
⚠️ Note: For Trigger steps, the Prior Activity Visibility toggle is on by default. This means participants who have already completed the trigger activity will get the step too. Turn it off if you only want the step to reach participants who complete the activity from now on.
What Are “Viewer Types”?
Viewer Type decides who can see the step. You have three options:
- Everyone: Both mentees and mentors can see the step.
- Role: Pick Mentee or Mentor to show the step to only that group.
- Match Status: Show the step only to participants with a specific match status. Choose from Matched, Unmatched, Duration Completed, Requested, or Needs Attention.
💡 Good to know: Match Status isn’t available for Trigger steps. When you pick the Trigger publish type, you can choose Everyone or Role.
What Are “Publish Types”?
Publish Type decides when participants get the step. Extra settings appear depending on the type you choose.
⚡ Instant
The step goes live and participants are notified as soon as you click Create.
📅 Scheduled
The step goes live on a date and time you choose.
- Publish Date: Click Select Date and Select Time to set when the step should be published.
- Hide From New Participants: Turn this on if participants who join after the scheduled date shouldn’t see this step. Leave it off if you want late joiners to see it too.
🔗 Trigger
The step goes live automatically when a participant completes (or hasn’t completed) a specific activity. You’ll see three extra settings:
- Trigger Type: The activity that sends the step. Options include:
- Profile: Profile Completed
- Matching: Any Match, First Match, First Unmatch, First Unresponsive Match
- Conversations: First Conversation Started, First Conversation Not Started, Started a Conversation But Not Replied
- Meetings: First Meeting Scheduled, First Meeting Not Scheduled, First Meeting Completed
- Goals: First Goal Set, First Goal Not Set, First Goal Completed
- Delay Time: How long to wait after the trigger before the step appears. Enter a number and choose Minute, Hour, Day, Week, or Month (for example, 3 Day).
- Prior Activity Visibility: This toggle is on by default. When it’s on, the step is also sent to participants who already completed the trigger activity. Turn it off if the step should only reach participants who complete the activity from now on.
To learn more about what the Prior Activity toggle does and when to use it, click here to read the full article ➜
What Is the “Action Type”?
Action Type is optional. It adds a button to your step so participants can jump straight to the right place in Qooper. For example, a Go to Learning button takes them right to the Learning page:

There are nine Action Types to choose from:
- Take Survey – opens a survey for participants to fill out
- Go to Groups – takes participants to Groups
- Go to Learning – takes participants to Learning
- Schedule Meeting – prompts participants to set up a meeting
- Set Goal – prompts participants to set a goal
- Post Discussion – prompts participants to start a discussion
- Give Feedback – prompts participants to share feedback
- Start Conversation – prompts participants to message their match
- Go to Mentoring – takes participants to Mentoring

How to Edit or Delete Existing Steps
- Go to Steps and find the step you want to change.
- Click the three dots (⋮) on the right side of the step card.
- Choose View Step, Edit Step, or Delete Step.
- If you’re editing, make your changes and click Update to save them.
💡 Tip: Want to change the order of your steps? Grab the dotted handle (⠿) at the top of a step card and drag it to a new spot.
Each step card also gives you a quick summary, such as the publish type, trigger and delay, who can see it, and how many people it was published to, so you can check your setup at a glance.

Learn More
- Match Status-Based Viewer Types — control who sees steps
- Trigger Types for Publishing Steps — control when steps are published
-
Action Types in Program Steps — control action type setups.